Showing posts with label Once Upon a Princess. Show all posts

Wednesday, June 27, 2012

Magnetic Dress Up with the Cricut

Hi all

So I am now in sunny Florida, (not so sunny with the storm at the moment).  The car ride went spectacularly well, no major meltdowns with the kids.  We did have to make it a two day drive though because of the storm, but we made it in one piece.  So last week I posted about the car ticket travel game.  It was a smashing success!!  Every time I asked the girls for a ticket, it was like a party in the car.  They would get excited and start singing "ticket time, ticket time".  Then they would diligently count how many tickets they had left.  So I highly recommend this game if you have a long distance to travel with the kids.

So the project I have for you today was also intended for the car.  I made the girls a magnetic doll dress up craft.  They really loved it and I am glad because it took me about 7 hours to complete altogether.  I will show you the pictures and then list the cuts and sizes.  It is a long list so read only if you really want to know the details.


So I used some printable magnetic sheets I got at Staples.  The come four sheets to a pack, 8.5 x 11" for about $10.00.  I needed to use the deep cut blade and housing with a setting of 6.  The pressure was set to high, and the speed to 3.  I also needed to use the multi-cut feature set to 2.  I used only one cartridge, Once Upon a Princess.  The cookie sheet you see was from Walmart and was only $ 0.92.  I did have to add extra magnets to the outfits after all the paper went on, because they didn't stick to well.  I don't think these magnetic sheets are intended to have paper on top of them.  So here is the list of cuts and sizes.  It is long, so if you made it this far thanks for stopping by. 

Cuts on the Magnetic Sheets:
  • Castle Base - 5"
  • Frog Base - 2"
  • Unicorn Base - 2.5"
  • Doll 1 Base - 4"
  • Doll 2 Base - 4"
  • Doll 1 Layer - 4"
  • Princess 1 Base - 4"
  • Princess 2 Base - 4"
  • Mermaid Base + Layer 1 Welded together - 4"
  • Dress 1 Base - 4"
  • Raincoat shift + Only raincoat boots - 4"
  • Cowgirl Base + hat - 4"
  • Pajamas Base - 4"
So the paper cuts are made at the same size above with the layers added for the decorations.  If you want a detailed list of the paper cuts please just leave a comment.  Also much of the time spent on the project was in making the cut files in the Cricut Craft Room.  If you would like my CCR files just leave a comment.  Well thanks for stopping by and I hope this has inspired you to create some of your own travel games.

Tuesday, May 22, 2012

Graduation Card with the Cricut

Hi all, hope your week has been going well.  Ours has been pretty good.  We got off to a good start this week, with meal planning and the like.  I even went to the gym before 9 am!!!  That is a feat around here.  Anyhow, I am bringing you a Graduation card I made for my darling 4 year old.  She is graduating from pre-school tomorrow.  She is so excited because she gets to sing with all of her class mates for the parents.  I can't wait to see if she actually sings once she gets in front of all those people.  So here is the card.


Card Recipe:

  • DCWV textured card stock cut down to an A2 size card
  • White card stock cut to 4" x 5.25" and embossed with the Swiss Dots Cuttlebug folder
  • Ribbon from Michaels
  • Girl cut from Once Upon a Princess at 3"
  • Outfit cut from Once Upon a Princess at 3"
  • Graduation cap made from two shapes in the Cricut Craft Room Basics
  • Tassel made with We R Memory Keepers Watermelon Floss
  • Sentiments from My Pink Stamper Sweet Baby and Family & Friends
Well thats the card.  I love how the tassel came out.  I found out after I made the card that her cap is white.  Had I known I would have customized that.  Oh well.  I am entering this card into two challenges this week.  The Graduation challenge over at Fantabulous Cricut and the Congratulations challenge over at My Craft Spot.   Thanks for stopping by, I hope you have a great week. 

Wednesday, May 16, 2012

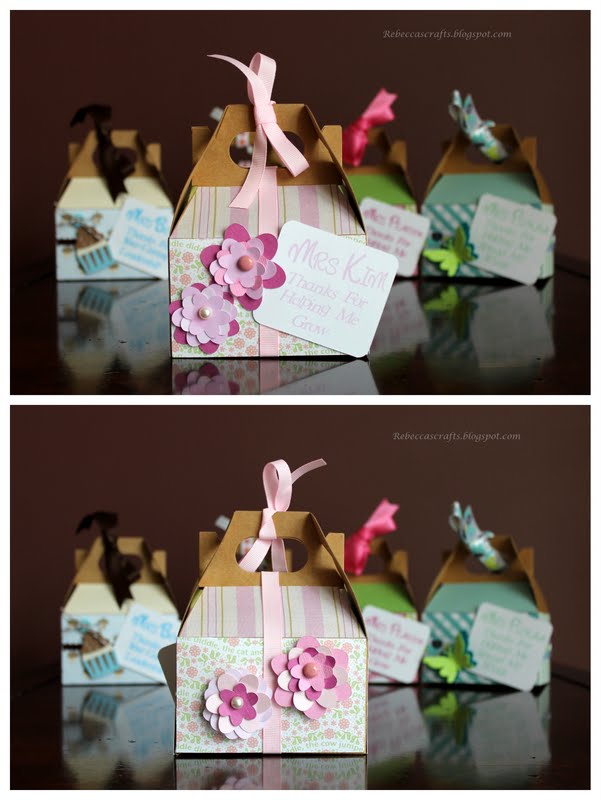
Teacher Appreciation Gifts with the Cricut

Hi all, I am back as promised with some Teacher Appreciation gifts I did last week.  These came together pretty fast and the teachers loved them.  I will not list a recipe for each, just a list of cartridges that I used to create them.


So I used these great gable gift boxes I found a Target in their dollar section.  Them came 3 to a pack for a dollar.  You can't beat that!!  I used a variety of patterned papers to decorate the sides of the boxes and some ribbon from my stash.  The tags I printed and cut with my Imagine.  It took a while to figure out how to get it to just print and them cut.  It involved putting the text on one layer in the Craft room and the square on another layer.  Then you just print on the paper first and then go back and cut the second layer afterwards.  I used the font from the Once Upon a Princess cartridge for all the tags.  The cartridges I used for the images are below.

  • Butterflies are from Kate's ABC's and Ultimate Creative Sampler
  • Birds are from Create a Critter
  • Flowers are from Kate's ABC's
  • Cupcake from Once Upon a Princess
So there you have it.  I filled the boxes with candy and a Target gift card.   I had a bunch of fun doing these boxes.  Thanks for visiting and hope you have a wonderful week. 

Saturday, January 7, 2012

Homemade Sticker Books

Hi all

I hope you are having a great weekend.  My weekend started out great with a fun fitness class with some girlfriends.  I am a little bit sore today but that just means I had a really good workout right!!!  So the project I am sharing today is an idea I came up with after my 4 year old kept complaining that she had nowhere to put the stickers that she would get from places like the doctor's office.  So I made my kids and a friends kids these sticker books for Christmas.  They were easy to make after I had decided what image was appropriate and personal to each child.


Each book is just a simple composition notebook that measures 9.5 in by 7.75 in.  I cut the paper from my own scrap sheets and used zip dry to adhere it to the covers.  I also covered the spines and backs of the notebooks in a similar fashion.  Here are larger individual images with the sizes and cartridges for the Cricut cuts.


The font is Character from Printing Press cut at 1.4" and 1.2".  The princess is from Princess Party cut at 4".


The font is also Character from Printing Press cut at 1.7" and 1.5".  The frog is from Create a Critter cut at 3.5".

The font is from Birthday Bash cut at 1.3" and 1".  The game controller is from Wrap it Up cut at 3".


The font is from Birthday Bash cut at 1.5" and 1".  The caterpillar is from Create a Critter cut at 3".  And last but not least...

The font is Monogram from Once Upon a Princess cut at 1".  The girl is Doll 3 from Once Upon a Princess cut at 3.5".  Her outfit is Dress 1 cut at 3.5 in.

All the Cricut cuts were designed using the Cricut CraftRoom.  I hope you enjoy these projects and have a great weekend.

Saturday, November 26, 2011

Advent Calendar and First Video

Hi all I hope you have had a fantastic Thanksgiving.  I having been having alot of fun with my family, with way more fun to be had next week.  So I have something exciting today.  I made my very first video!!!  Please no over the top laughter as it is my first video.
Anyhow I am going to share with you the Advent calendar that I made.  I really love how it turned out and plan to use if for years to come.  I got the idea here and made some simple changes that I think made it a little special.  I have been using all of the inspiration floating around the blog-o-shpere and am really thankful for all the ideas.
So here is the calendar and video of how to make the pockets.  The original author used library pockets but since I didn't have any of those lying around my video shows how I made them and then embellished them.


Recipe:
  • For the pocket cut down a manilla file folder to 8" x 4" and score at 3.75".  See the video for more instructions
  • The base layer ornament is 2.77" x 3.75" from Simply Charmed
  • Top layer ornament is 2.36" x 3.2" from Simply Charmed
  • Numbers at 1.25" from Plantin Schoolbook
  • Insert card base is 3.5" x 3" from Once Upon a Princess
  • Insert card top layer is 3.10" x 2.30" from Once Upon a Princess
I hope you enjoy and have given you more ideas for a DIY Advent calendar.

Thursday, October 6, 2011

Birthday Madness

Hi all
We are into our crazy birthday month over here in our household.  We just celebrated our oldest daughters' 4th birthday a couple days ago and had so much fun.  I wanted to share a couple of projects that I did to celebrate her birthday.
The first project was a banner.  This is the first banner that I have made and really had fun doing it.  I wanted to embellish it more but ran out of time.  I plan on doing one for our younger daughter later this month and will definately try to do something different.  I think I may need to invest in a new camera because the white letters didn't show up so well in the picture but it looked great in person.

The Recipe is:
  • Waved triangle from Birthday Bash at 6.25"
  • Standard triangle from Birthday Bash at 6"
  • Lettering from Once Upon a Princess at 2.5"
  • I used craft ribbon to attach the banner pieces together and kitchen twine to hang the completed banners
The second project was a birthday card for my little girl.  She really loves bugs so I decided to go with a ladybug.  This was just a quick card that I through together last minute so it is nothing fancy but she still loved it.  The flowers were from her Daddy.  Some poor man in the future is going to be in trouble because my hubby always gets the girls flowers for special occasions.
The Recipe is:
  • Card base is 6" x 6" of white card stock
  • Image base is 5" x 5" of pink card stock that I embossed with the Swiss Dots Cuttlebug folder.
  • Ladybug from Birthday Bash at 4.5"
  • After the fact I also added white stickels to the tops of the bugs antenna
  • Sentiment is My Pink Stamper - Family & Friends
The last project I did was to make treat bags and cookies for my daughters school birthday celebration.  It is really nice that they allow us to bring in cookies for the kids and they all sing happy birthday at lunch.  I also made a triple batch of these cookies to send to my brother overseas.  He just left from is mid-tour leave and I thought that it would make going back a little easier.  So here are the cookies and treat bag toppers.


The Recipe is:

  • Topper base is an image from Birthday Bash at 4.5" and is embossed with the Swiss Dots folder for the Cuttlebug
  • Image base from Accent Essentials at 3.5" wide by 2.1" high
  • Birthday hat from Simply Charmed at 2"
  • Sentiment is My Pink Stamper - Sweetest Cupcakes
Hope you all enjoy these projects and please feel free to leave me comments on how I can make my pictures come out better.  It is either me or the camera and so far can't figure it out.  Anyhow hope you have a great evening.  

Monday, September 12, 2011

Crafting Cabin

Hey all

Over the Labor day weekend my family shared a lake house cabin with some good friends of ours.  I brought all the crafting stuff my car could handle with the intentions of getting my daughters' birthday invitations done.  Well my girlfriend and I didn't get much crafting in due to a Twilight diversion.  Those movies are just so darn good and we had to get schooled up before the next one comes out.

On the last night after all the kiddos had gone to bed we finally broke out the supplies and decided to make some cards to give our kids on their first day of school.  Here is a picture of our messy set-up.

So I decided to make some cutsy cards for my girls instead of a back to school theme.  We don't have to go buy supplies yet so I thought they might not get a back-to-school theme.  The card I made Charlotte was based on her favorite dessert and the card for Corianne was based on her favorite animal.  The recipes follow the pictures.
Recipe:
  • 6" x 6" cardstock
  • Patterned paper is DCWV from The Sweet Stack
  • Cupcake:  Once upon a Princess - cupcake3 at 3.75"
  • Stamped Sentiment:  My Pink Stamper - Sweetest Cupcakes
Recipe:
  •  6" x 6"
  • Cat:  Create a Critter - cat2 at 3.5"
  • I luv u:  Create a Critter - Koala Phrase at 1.5"
  • Crown: Once Upon a Princess at 1"
  • Stamped Sentiment: My Pink Stamper - Family & Friends
So those were the cards for my girls and I gave Charlotte's to her today.  She said she loved it very much.  The cards my girlfriend Angela made were also super cute.  I am hoping that she will do a guest post on her cards sometime soon, when her life has calmed a bit!!!  Did you do anything crafty for your kids back-to-school?  Drop me a comment to let me know.  I love new ideas!!