Showing posts with label Create a Critter. Show all posts

Wednesday, May 16, 2012

Teacher Appreciation Gifts with the Cricut

Hi all, I am back as promised with some Teacher Appreciation gifts I did last week.  These came together pretty fast and the teachers loved them.  I will not list a recipe for each, just a list of cartridges that I used to create them.


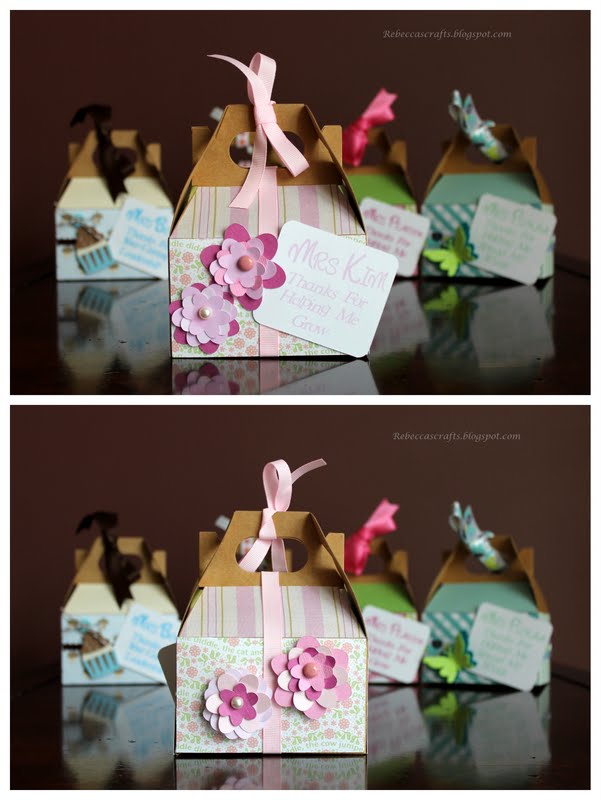
So I used these great gable gift boxes I found a Target in their dollar section.  Them came 3 to a pack for a dollar.  You can't beat that!!  I used a variety of patterned papers to decorate the sides of the boxes and some ribbon from my stash.  The tags I printed and cut with my Imagine.  It took a while to figure out how to get it to just print and them cut.  It involved putting the text on one layer in the Craft room and the square on another layer.  Then you just print on the paper first and then go back and cut the second layer afterwards.  I used the font from the Once Upon a Princess cartridge for all the tags.  The cartridges I used for the images are below.

  • Butterflies are from Kate's ABC's and Ultimate Creative Sampler
  • Birds are from Create a Critter
  • Flowers are from Kate's ABC's
  • Cupcake from Once Upon a Princess
So there you have it.  I filled the boxes with candy and a Target gift card.   I had a bunch of fun doing these boxes.  Thanks for visiting and hope you have a wonderful week. 

Saturday, March 24, 2012

Shaped Easter Cards - Part II

Hello all, hope you are having a great weekend.  We are having a wet one here on the east coast.  So wet the Easter Egg hunt for today was cancelled.  That's okay though, because we are still going to head over to our friends house for dinner tonight, should be fun.  We today I am continuing with the Easter theme here.  I have made two really cool shaped cards to give for Easter.  These are incredibly easy to do with the Craft Room by Cricut.  Here is the first card.


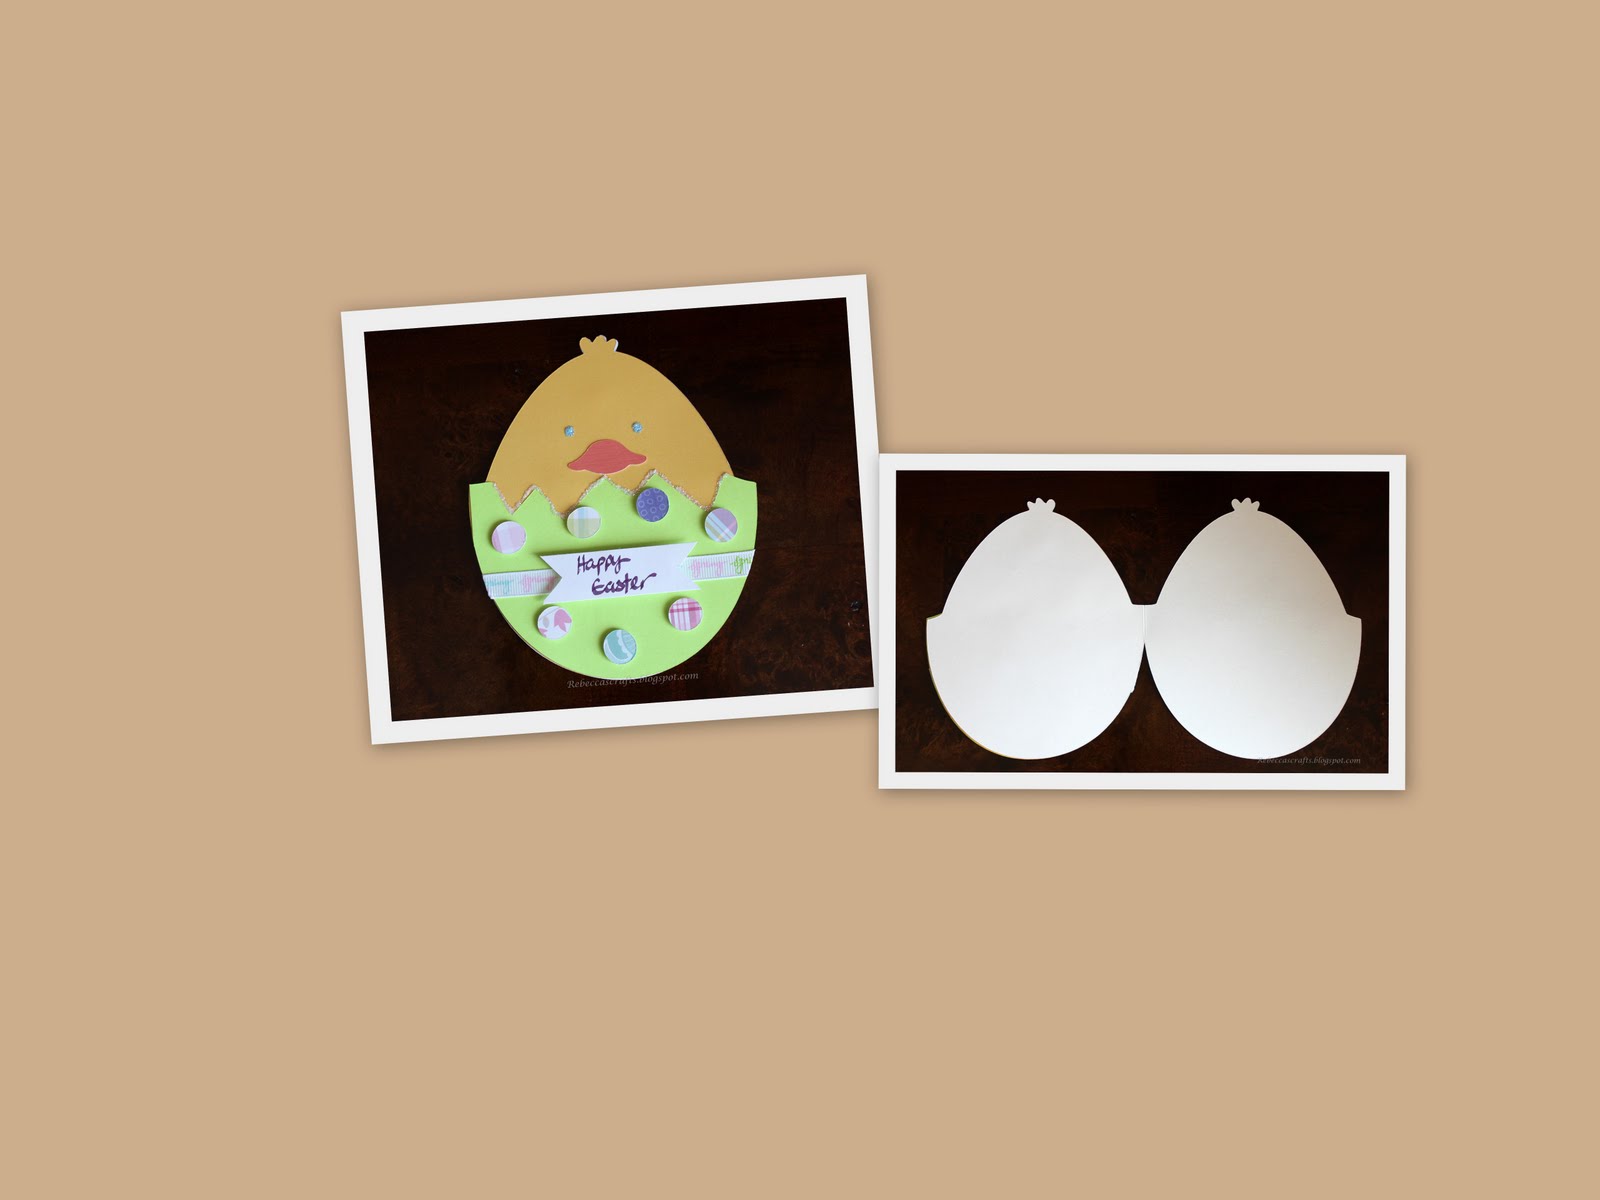
This first card is made from the Create-a-Critter cartridge.  There is the image of the cracked egg.  I placed this on the mat in the Craft Room and then copied and flipped it horizontally.  I then welded the two eggs together to make the card.  I then used scrap pieces of pattered paper to make to stripes on the egg.  I think this is one of my favorite cards I have made to date.  Just came out so darn cute.  Oh and again, all the paper for this card came from my scrap paper bin, yeah!!  I am entering this card into a challenge over at the Twineology blog.  

Card Recipe:
  • Cracked Egg from Create-a-Critter cartridge cut at 4"
  • Chick from Create-a-Critter cartridge cut at 3"
  • Twine from Timeless Twine
  • Flower and button from stash
  • Google eyes from dollar store
The second card I have for you is along the same lines but a different shape.  I used the same welding method described above in the Cricut Craft Room to make the card base.


Card Recipe:

  • Hatched Chick and layers from Simple Charmed Cartridge cut at 5.5"
  • Spring ribbon from Michaels
  • Scrap pattered paper for the polka dots
If you would like the cut files for these cards for the Craft Room or the Gypsy let me know and I will email them to you.  Hope you have enjoyed the cards and have a fantastic weekend.

Thursday, March 1, 2012

Photo Book for a Toddler

Good evening all, hope your week as been great and productive.  I am excited that tomorrow is Friday!!!!  Yeah my hubby comes home and we can have a weekend of fun.  I am thinking Ice Skating.  My 2yo has never done it, but when we took her to see Disney on ICE a couple weeks ago she was so excited she lifted her little leg in the air and screamed "I skate I skate".  So I am thinking that should be on our agenda.  Anyhow, the craft I have for you today is a photo book I created for a friends toddler.  They get quite a bit of Christmas photo cards over the holidays and she was just letting her toddler pull then out of a bag to look at them.  When I said that I could bind them into a book my friend said sure.  So without further adieu:


The process for the book went as follows:  First I matted all the Christmas photo cards onto 9" x 6" card stock.  This was the smallest I could use based on the size of the photo cards and to ensure that when bound none of the pictures would have holes in them.  The covers are done using 12x12 chipboard that is then cut down to 6" x 9".  I then used pretty paper to cover the chipboard.  The really interesting thing I did was to create a magnetic closure for the book.  You can see from the first and last photo that there is a flap that opens.  This flap magnetically closes to the front of the book.  I got the idea from one of Heidi Swapp's episodes on My Craft Channel.  It is a video tutorial of an 8x8 book that she did with a magnetic enclosure.  I will leave all the details to her.  Next time I do something like this I will try to photograph it in the stages of the project.  I used my new Bind-it-all to bind the project.  The name Kiran was done with embossing powder.

I hopped by one of the blogs I read regularly and found out they were having a challenge.   I came, I saw, I created holds a color challenge every week.  This weeks challenge was to use Tangerine Tango, Tempting Turquoise, and Old Olive.  She gives you the RGB codes for each color.  My papers already had these colors in there, but because I needed to embellish the book a little, I pulled out my Imagine.  The camera  is cut from the Create-a-Critter cartridge at 3.5".   I used the Cricut Imagine to print and cut the camera with the exact RGB codes.  It came out great!!!  I then used some glossy accents on the lens, flash, and shutter button. 

I realize this is different from my normal posts were I usually give a craft recipe at the end of the post.  I decided to be a little more verbose in this post.  Please comment and let me know if you like either style better or would like to see a combination of both.  Thanks so much for coming by and have a great weekend!!!

Monday, February 27, 2012

A Bunny Birthday

Good evening all.  I hope your week has gotten off to a good start.  Ours has been really good.  I started the week by making a couple meals including enough breakfast burritos to last two weeks.  This week should be really easy with all this prep!!

So today I have a craft done for a good friend.  Her son's 2nd birthday was last week and she asked me to make a banner with the words " Some Bunny is Two".  I think the banner came out really great, one of the best ones that I have done.  I also wanted to do a card for the birthday boy in the same theme.  Below is what I came up with.


Banner Recipe:

  • Card stock from DCWV stack
  • Font from Kate's ABC's cut at 2.5"
  • Bunny from Kate's ABC's cut at 3.75"
  • Circle banner from Birthday Bash cut at 6.25"
  • Triangle banner from Birthday Bash cut at 6.35"
  • Ribbon from Michaels

Card Recipe:
  • Rabbit from Create-a-Critter cut at 6"
  • Used the Craft Room to create two rabbits, one flipped horizontally and then both welded together
  • Sentiment written with a brown calligraphy pen
  • Card stock from DCWV stack
Hope you all have enjoyed the crafts.  I am entering the bunny card in a challenge over at My Craft Spot.  Thanks for joining me.  Until next time

Tuesday, February 21, 2012

Okay I know Valentine's Day is Over

Good evening all.  As the title says I know Valentine's Day is over but I do have a few more related crafts to show you.  I mentioned in my last post that I would show how I used the treat toppers and so here they are.


I made 12 of these great Red Velvet Whoopie Pies for the kids goody bags.  I got the baking inspiration off of Pinterest.  The actual recipe site is here.  I changed up her filling recipe a bit.  Her cream cheese filling was absolutely delicious on its own but I thought that for a whoopie pie it needed to be less dense.  So I made some whipped cream and folded it into the cream cheese filling,  This made the whole desert have a lighter feel to it.  They were great and I may make them every year.
Here is a pic of my girls showing off their Valentine's from mommy.


And on a final note I wanted to post the Valentine's Card I made for my 2yo class party.


I had to make 13 of these cards so I kept them pretty simple, but I do love the handwritten sentiment. 
Card Recipe:

   * 3" x 3" red card base
   * Heart from Plantin Schoolbook cut at 2.5"
   * Bee from Create-a-critter cut at 2"
   * Ribbon from Jo-ann's
   * Frosted Lace Stickles
   * Embossing from Simply charmed Companion set

Hope you enjoy.  I also wanted to mention a great score I found at Tuesday Mornings.  I walked in there the other day just to see what they had in their crafting section and I saw a Zutter Bind-it-all V2.  The set came with the wire and some chipboard for a price of ..... $25.10!!!!  I could not pass this up.  I already have a project lined up to use it with.  Hope you have a wonderful evening.

Thursday, February 9, 2012

Valentine's Love

Good evening all.  It has been a crazy week here but for good reason.  We have one extra toddler in the house, my brother's daughter.  We are taking care of her while my sister-in-law goes to meet my brother who just came back from Afghanistan.  We are so glad he is back safe and sound for good and are really grateful for his service.  A house with three children 4 and under does make for a little chaos but alot of fun.
The project I have for you tonight is the boxes I made for my 4 year old's class valentines.  I decided to make little match boxes to hold candy for the kids.  She loves them and very proudly wrote her name on the back of each box.


Craft Recipe:

   * Matchbox cut at 4" from Tags, Bags, Boxes and More
   * Heart cut from Create-a-Critter cut at 1.5"
   * Sentiment from My Pink Stamper Love-alicious
   * Swiss Dot cuttlebug folder
   * Xmas Red Stickles
   * Ribbon from stash

I just used a standard tape runner for the adhesive as I figured they would get torn apart while the kids were trying to get the candy.  I am entering this in the weekly challenge over at Fantabulous Cricut, which was to use a heart on your project.  Hope you all enjoy and have a great end to your week. 

Saturday, February 4, 2012

Valentine's Card for Kids

Good evening.  I have been working on Valentine's cards for my kiddos this week.  It is only right around the corner!!!  This is one of my favorite holidays because it is all about expressing your love.  I decided to use a dimensional gate fold card that I haven't done before.  I think the cards came out great and the kids are really going to love them.  I also made a video showing how I created the cards.  Here they are.


Here are some pics of the other card I made as well.


Card Recipe and Supplies:
 Owl Card:
   * Start with a 5" x 12" piece of card stock - K & Company
   * Start at one side and score at 2" 4" 8"  and 10"
   * Should have an inside card dimension of 5" x 4" with two 2" folded flaps
   * Elegant Edges Hearts1 oblong feature cut at 4" - then cut in half
   * Plantin Schoolbook heart cut at about 1"
   * Create-a-Critter Owl cut at 3"
   * Ribbon from Jo-anns
   * Crop-a-dile used for the eye-lets
   * Cotton Candy Stickles

Love Bug Card:
* Start with a 5" x 12" piece of card stock - K & Company
* Start at one side and score at 2" 4" 8"  and 10"
* Should have an inside card dimension of 5" x 4" with two 2" folded flaps
* Elegant Edges Hearts 2 oblong feature cut at 4" - then cut in half
* Simply Charmed Love Bug 2 cut at 2.75"
* Simply Charmed Love Bug Sentiment cut at 1"
* Ribbon from Jo-anns
* Crop-a-dile used for eye-lets
* Cotton Candy Stickles

I have also entered this card into the Anything Goes challenge over at My Craft Spot.

Have a great weekend!!!

Saturday, January 7, 2012

Homemade Sticker Books

Hi all

I hope you are having a great weekend.  My weekend started out great with a fun fitness class with some girlfriends.  I am a little bit sore today but that just means I had a really good workout right!!!  So the project I am sharing today is an idea I came up with after my 4 year old kept complaining that she had nowhere to put the stickers that she would get from places like the doctor's office.  So I made my kids and a friends kids these sticker books for Christmas.  They were easy to make after I had decided what image was appropriate and personal to each child.


Each book is just a simple composition notebook that measures 9.5 in by 7.75 in.  I cut the paper from my own scrap sheets and used zip dry to adhere it to the covers.  I also covered the spines and backs of the notebooks in a similar fashion.  Here are larger individual images with the sizes and cartridges for the Cricut cuts.


The font is Character from Printing Press cut at 1.4" and 1.2".  The princess is from Princess Party cut at 4".


The font is also Character from Printing Press cut at 1.7" and 1.5".  The frog is from Create a Critter cut at 3.5".

The font is from Birthday Bash cut at 1.3" and 1".  The game controller is from Wrap it Up cut at 3".


The font is from Birthday Bash cut at 1.5" and 1".  The caterpillar is from Create a Critter cut at 3".  And last but not least...

The font is Monogram from Once Upon a Princess cut at 1".  The girl is Doll 3 from Once Upon a Princess cut at 3.5".  Her outfit is Dress 1 cut at 3.5 in.

All the Cricut cuts were designed using the Cricut CraftRoom.  I hope you enjoy these projects and have a great weekend.

Tuesday, December 13, 2011

Hello and Santa Wishes

Hi all

It has been a while since I posted.  We went to Florida to visit family for Thanksgiving and then took the kids to Disney as a surprise.  It was so much fun!!!  The girls were loving meeting all the characters and being absolute princesses.  Here is a photo to show off a cute princess moment.

So now onto Santa's wishes.  We did our first letters to Santa this year and in my loving of crafts I had to whip up a quick really cute way to write Santa.


I made these really fast the night before and I hope that they get to Santa in time.  I really love the reindeer.  I would have put all nine on each sheet if there was space!!!  These reindeer are from the Create a Critter cartridge and the lettering is from Birthday Bash.

I have alot more projects coming up as I made some Christmas gifts and just finished our in-house Christmas cards!!!

I hope you enjoy and all your Santa Wishes come true!!!

Friday, November 18, 2011

Thanksgiving Card

Hi all

I hope you are having a great week and not too stressed out about the upcoming holidays.  We are getting ready here.  So today I have a card that I did for my brother.  He is in Afghanistan and I wanted to send him something to remind him how much we love him and miss him during this holiday.  I made him cookies and a cute card.


I made this card using my Imagine and the Cricut Craft Room.  This is the first time that I have used my new Imagine to make an entire project, well except the ribbon.  I only used white paper as the Imagine allows you to put color to any image, even the standard cartridge images.  It was really fun.  I did have a little fuss with the Craft Room, but I am working through those issues.  I am sure that they are my issues!!!  Anyhow I hope you enjoy and have a fantastic Thanksgiving.


Card Recipe:

  • Card base is 5" by 6" and used a paper patter from the Imagine More Cartridge
  • Turkey cut at 4" from the Create a Critter cartridge
  • Sentiment cut at 1.5" from Simply Charmed
  • Golden Rod Stickles (After the fact I also added stickles to the top hat but never got a picture of it!!)
I have also entered this card over at the Fantabulous Cricut blog for their Challenge Me Monday Harvest Blessings.  


Wednesday, October 19, 2011

Birthday Madness - Part II

Hi all

So we have made it through the middle of the birthday madness month.  We had a party with family and friends to celebrate both of our girls birthdays'.  It was really fun because we went to the local fall festival and just had a blast going on all the slides and the hayride.  For their birthdays I made push-pop cakes. I got the idea from a blog I follow called Gourmet Mom on the Go.  The link to her post is here: http://www.gourmetmomonthego.com/2011/04/push-pop-cakes.html

Here are the ones that I created. 

These are made using mini pumpkin cupcakes and in between is orange cream cheese frosting.  They were so yummy.  Now you may be wondering about the fantastic stand that they are displayed in???  Well I told my husband how I wanted to display them and he did most of the work.  I made a flower template using my Cricut and the Create a Critter cartridge.  My husband then went to the hardware store and bought the wood and the stand.  Hey used the template to cut the flower with a router.  He then spray painted it white and I attached the ribbon to the edges.  I think it came out super cute.  Best part is that I can paint them whatever color I want and change the ribbon out to customize it to any party decor.  Here are some photos of just the stand themselves.


 Since it was a party for kids, I also made goody bags for them. 


I just took a piece of 12 x 12 green card stock and cut it down to four 6 x 6 pieces.  I used the Create a Critter cartridge to cut the pumpkin at 3.5".  I used My Pink Stamper's Everyday Sentiments for the Thank You and embossed it with linen embossing powder.  I also used white sakura pen to create the stitching around the edges. 

Well hope you enjoyed today's goodies.  Also stay tuned because on Friday I have some exciting news and can't wait to share it with you!!!!

Monday, September 12, 2011

Crafting Cabin

Hey all

Over the Labor day weekend my family shared a lake house cabin with some good friends of ours.  I brought all the crafting stuff my car could handle with the intentions of getting my daughters' birthday invitations done.  Well my girlfriend and I didn't get much crafting in due to a Twilight diversion.  Those movies are just so darn good and we had to get schooled up before the next one comes out.

On the last night after all the kiddos had gone to bed we finally broke out the supplies and decided to make some cards to give our kids on their first day of school.  Here is a picture of our messy set-up.

So I decided to make some cutsy cards for my girls instead of a back to school theme.  We don't have to go buy supplies yet so I thought they might not get a back-to-school theme.  The card I made Charlotte was based on her favorite dessert and the card for Corianne was based on her favorite animal.  The recipes follow the pictures.
Recipe:
  • 6" x 6" cardstock
  • Patterned paper is DCWV from The Sweet Stack
  • Cupcake:  Once upon a Princess - cupcake3 at 3.75"
  • Stamped Sentiment:  My Pink Stamper - Sweetest Cupcakes
Recipe:
  •  6" x 6"
  • Cat:  Create a Critter - cat2 at 3.5"
  • I luv u:  Create a Critter - Koala Phrase at 1.5"
  • Crown: Once Upon a Princess at 1"
  • Stamped Sentiment: My Pink Stamper - Family & Friends
So those were the cards for my girls and I gave Charlotte's to her today.  She said she loved it very much.  The cards my girlfriend Angela made were also super cute.  I am hoping that she will do a guest post on her cards sometime soon, when her life has calmed a bit!!!  Did you do anything crafty for your kids back-to-school?  Drop me a comment to let me know.  I love new ideas!!