Thursday, July 18, 2013

Birthday Cards Galore

Hi all, so we are in the throws of summer.  It is so hot here I melt every time I go outside. We have been spending a lot of time at the pool between swim team and trying to cool off!!!  I hope you all are having a good summer.  So today I have a few birthday cards I have made to show you.  Interestingly enough these are all birthday cards from past months because we actually have no birthdays in July to celebrate.  I feel fortunate for that though, because I might not have had the time to make the cards if there had been.  So here we go:


These two cards were made for a double birthday that my girls were invited to.  The first card was for a boy.  I searched for an Angry Birds svg on the internet and happened to find one for free.  I decided on Angry birds because my youngest had chosen an Angry birds car set for the little boy.  I used some embossing powder to stamp the sentiment on the front.  The second card was for a little girl.  I was teeming to use some glitter so I cut the hat and sentiment out of the Silhouette double sided adhesive paper and then sprinkled the glitter on one side after I had adhered it to the card.  I have to say I really love this paper and glitter technique.  I believe I came across it on the blog Sprinkled with Glitter.


These last two birthday cards were for some rather great people in my life.  The first card was for my good friends 40th birthday card.  It really is fitting to her as she is fabulous and doesn't look the least bit 40.  I used some Dear Lizzy ruffled crepe paper as the background.  I used the Silhouette to print the sentiment on the Heidi Swapp patterned paper and to cut the photo frame and arrow.  I then created the bow with some scrap ribbon that I had on hand.  The last card in one for my dear hubby.  He loves his motorcycle.  I took some inspiration form Pinterest for this card as I have a really hard time with masculine cards.  I again used the Silhouette print and cut feature for the sentiment.

Well that is that.  I hope you have enjoyed and get some new inspiration from the cards.  Have a great evening and try to stay cool during these hot days.  Till next time ...

Friday, July 5, 2013

Cards and Albums made during the Motography Class

Hi all, look three posts in a row!!!!  How about that!!!  So back in February I took this awesome online class by Jessica Sprague and Heidi Swapp called Motography.  Here is the link to the class page.  It was a week long course about using your camera phone to take better pictures, editing your pictures on your phone using various apps, and also getting the photos off the camera and using them in different kinds of projects.  Let me tell you this was a fantastic class and well worth the $20 I paid.  I learned everything I mentioned above and more.  One of the big focuses of the class was learning how to use Instagram to quickly edit and post your photos.  In addition to the camera side of the class we made a couple really cool card and mini-book projects to showcase the photos.  Here are the cards we made:


These cards were really simple to make and would be great to send to friends or grandparents to give a little update on the kiddos.  I learned while making these cards that you can use your inkjet printer to print on sheets of vellum for a really cool photo effect.  I really love the slider card on the right.  You can put three 2x2 photos on the card for a fun photo booth strip effect.  I sent the first card to my Mom as a birthday card and the second to my sister-in-law as a thank you for hosting us for a weekend.

The second project that we made was a mini book using just a 12 x 12 sheet of scrapbook paper.  I wish I could remember the details, but they were pretty intricate in the way you had to fold and attach to papers.  Here it is:


These little books are so cute, I love them.  I made one for each of the girls with silly photos of them I had taken of the week.  They kind of got irritated with me by the end of the class, because I was taking so many photos with my phone.

So that is that.  If she offers this class again I would highly recommend it.  It was a great combination of  photo and scrapping education.  Thanks for stopping by and hope you enjoy your weekend.

Wednesday, July 3, 2013

Hello Again and Summer Journals for Kids

Hi there, it has been a very long time since I posted last, almost two months!!!  I hope this finds all of you well and enjoying your summer.  We have been really busy here with the end of the school year and getting started with our summer fun.  I have to say I haven't really been crafting that much but I do have quite a few projects that I have done but just haven't had the time to post.  This year our summer is especially busy because my daughter started swim team for the first time, and that is an almost everyday  activity until the end of July.  She is really loving it and I think it is great for her self-esteem so it is not so much of a burden in those respects.

Well on to introducing a project.  My daughter starts Kindergarten in the fall and I wanted her to have some summer learning opportunities so that she would be ready for school in the fall.  I had heard from a friend that her children had to keep journals in Kindergarten, so I thought that would be a fun idea.  So here is what I created:


This book was really easy to make, only took about 15 minutes total.  First I found this great school lined paper on the internet and printed about 50 pages front and back.  Then I took some cereal box cardboard and cut it to 8.75 x 11.25.  I used some of my scrapbooking paper to to cover both sides of the front and back covers.  I then used my Bind-it-All to bind the journal.  Next I used my Silhouette to cut the cover title and adhered it to the cover.  Last I used a bunch of my scrap ribbon to add some fun embellishment to the binding.  

The way we use the journal, is almost everyday I ask her a simple question.  Example:  What is your favorite sport?  The when she tells me, I write the answer in sentence form on the first line.  I have her then draw a picture of whatever it is and copy the sentence on the remaining three lines.  I figure this gets her writing, spelling, and sort of reading all at the same time with some fun art thrown in there.

Now my 5 year old has a 3 year old sister, and as those of you with two kiddos know, the younger one always has to have and do the same thing as the older one.  So I made the little one a miniature version for her to do art projects in.


Well that is all I have for you today.  I hope to get back on a regular posting schedule soon.  Hope you keep enjoying your summer.

Wednesday, May 8, 2013

Teacher Appreciation Week Gifts

Hi all, sorry I haven't been around in a while.  Just been busy with the kids and friends.  I have been crafting, just not enough time to post about it.  So today I am sharing the Teacher Appreciation gifts I made last week.  We gave them to the teachers today.  I decided that you can never have to many cards for notes lying around, so I made each teacher a set of 10 monogrammed cards.


As you can see I really love Chevron!!!  It also made it super easy because I just printed the pattern on a letter size paper, then cut it in half to make 2 A2 sized cards from each sheet.  I made the monograms with my Cameo and a monogram set I purchased in the Silhouette store.  Next I made some boxes for the cards to be packaged in,


This is a Lori Whitlock card box file I purchased in the Silhouette store.  It was really easy to put together and decorate.  All the paper if from a Dear Lizzy paper stack I got on clearance at Target.  I think Target decided to stop carrying scrapbook supplies, so when I noticed them all on clearance I picked up a bunch of paper packs and albums.

So that is all I have for you today, hope you enjoyed.  Don't forget to thank all those wonderful teachers in your life.

Thursday, April 18, 2013

Thank You with the Silhouette

Hi all

It has been a while since I posted.  We have been doing a lot of spring cleaning around here and I haven't really spent much time in my craft space.  Just took a break I guess.  Well I am back and have been crafting plenty of cards.  The one I have to show you today I need to explain a little before I post the picture.
So I have been taking a dance class now for about two years.  It is really a dance/fitness class.  It is called pole fitness or pole dance.  Now before you go all crazy and get judgmental on me, let me explain the background.  Two years back some girlfriends and I decided to go out for dinner and a fun fitness class.  We chose an Intro to pole class.  We went and had a blast, never really thinking we would go back.  Well the next morning I woke up and was in such pain (the good pain you get after a good workout) that I decided I was going to try Pole Level 1.  Well two years later and I am at Pole Level 7 and graduating to be able to do Pole Masters classes.  I am telling you this workout has transformed my arms.  They used to wave back when I waved!!! No longer does that happen.  And it is really fun.  So with that here is the card I made as a thank you to my class instructor, who has pushed me passed my limits (or what I thought were my limits).


So I made this using my Silhouette Cameo.  The card base is the step card from Lori Whitlock found in the Silhouette online store.  The girl silhouettes are done by importing the jpeg image into the Silhouette Designer Studio and using the trace feature.  This took a bit of work but I love how it came out.  All the papers are from Heidi Swapp, the Sugar Chic collection and her ColorMagic Papers.  I did the poles with some glitter powder.

Well I hope you have enjoyed this card.  I know it is a little racy, but it comes from a place of fitness.  And just to let you know I can do many things upside down on the pole!!!!  Takes strong arms and legs to do that and I am pretty proud of myself.  Hope you all have a wonderful weekend.

Saturday, March 30, 2013

Birthday Goodies with the Silhouette

Hi all, happy Saturday.  It has been a fun week here in Florida.  We went to the zoo, and the beach, and Legoland this week so we have been busy.  Today I am getting a sort of day off.  I just got back from getting a gel manicure for the first time and later today I am going to play golf with my Dad.  Love relaxing!!!

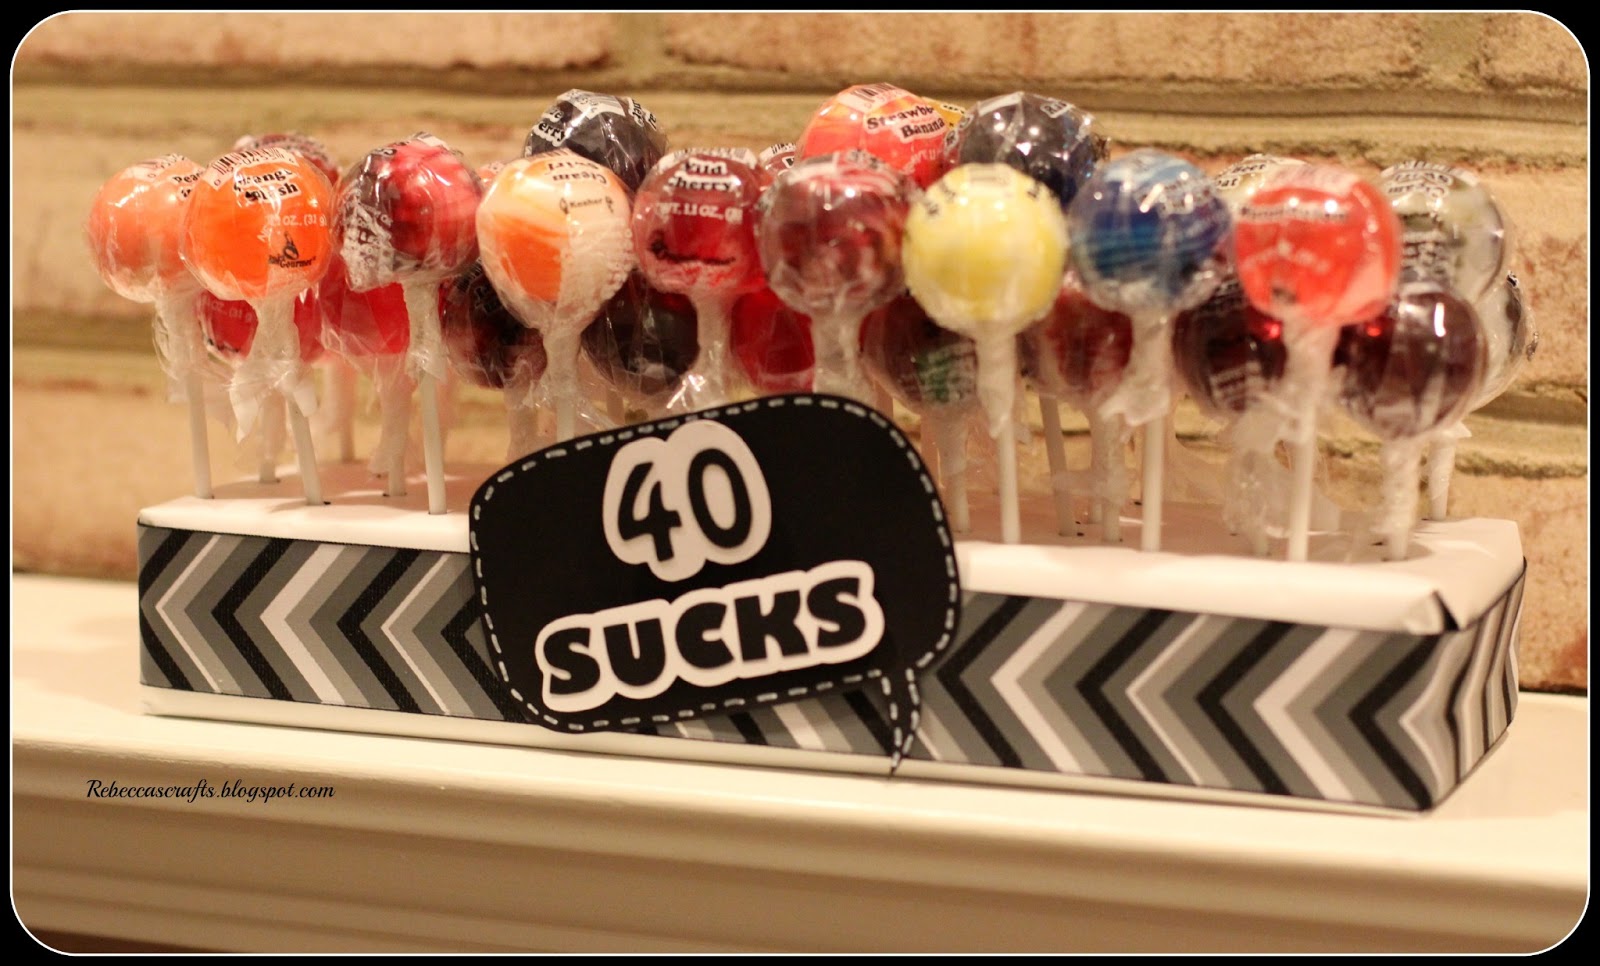
So today I have some Birthday Goodies I made for a good friend of my husbands.  He turned 40 this year and we went on a wine tour with a party bus to celebrate with him and his family.  So I had to make something crafty for him of course.  Here is what I came up with after surfing Pinterest.


This is just 40 suckers stuck into a foam block from the craft store.  I covered the foam with some Christmas wrapping paper turned inside out.  The chevron ribbon is from Joann's.  I then made the tag with my Silhouette   The faux stitching on the bubble is done using a Sakura gel pen.


I thought this card was appropriate since we were going wine tasting to celebrate.  I used the print and cut feature on the Silhouette to create the card front.  I pooped up the 1973 oval to add some dimension to the card.  The base of the card is Heidi Swapp color magic chevron paper sprayed with some black color shine.  I didn't let the color shine sit on the paper to long because I did want a more grey look.

So there you have it.  I have a couple friends turning 40 this year so I am really going to have to get creative with my cards and gag gifts.  Hope you have a great weekend!!

Tuesday, March 26, 2013

Spring Break Layout

Hi there, hope your week is going well.  We here are on spring break.  My kids and I are down in sunny but cold Florida visiting my parents.  It is really cold down here with a freeze warning tonight, but alas we are still having fun.  So I thought it fitting that I share a spring break layout I completed a couple months back.


I love this layout for so many reasons.  The first being I got 7 photos on a page!!  When I am scrapbooking I am all about geting as many photos in as I can and these 7 photos really did sum up our vacation.  I can't remember what paper line I chose at the moment, but everything was pre-cut.  I used some Amy Tangerine Thicker letters and spayed them with some pink mist.  The chipboard pieces are from a class I took at a scrapbooking expo that I sprayed with mist.  I used my We R Memory Keepers Sew Easy to make it look like the pictures were part of a banner.

So there you have it.  I have been taking lots of pictures while on spring break so hopefully I can create another great layout.  Thanks for visiting and hope you have a crafty week.