Monday, May 21, 2012

Craft Center Progress!!!

Hi all, I hope your weekend was fantastic.  Mine was great.  My hubby got started on my craft center and made great progress.  So super excited about that.  I helped him cut most of the wood for the project which feels good.  I actually contributed to a wood crafting project!!!  I don't really do power tools so this is a stretch for me.  Anyhow I wanted to share some pictures of the progress.


This is what he started with.


This is what he got done on day one.  He did this all from his head!!!  He really is super talented.


This is what he did on day two.


This shelving side is to hold 12 x 12 paper and underneath my Cricut Imagine.


This side has three drawers and a custom ribbon holder/dispenser.  I am loving this ribbon storage inside the actual desk.  Underneath I plan to put my bin of random supplies.


So that is the progress so far.  Next weekend we get to paint it, install the hardware, and install it in the space.  By Monday I should have and installed craft space.  So excited.  I will post pictures once it is complete.  Have a great evening. 

Wednesday, May 16, 2012

Teacher Appreciation Gifts with the Cricut

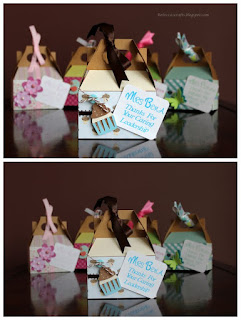
Hi all, I am back as promised with some Teacher Appreciation gifts I did last week.  These came together pretty fast and the teachers loved them.  I will not list a recipe for each, just a list of cartridges that I used to create them.


So I used these great gable gift boxes I found a Target in their dollar section.  Them came 3 to a pack for a dollar.  You can't beat that!!  I used a variety of patterned papers to decorate the sides of the boxes and some ribbon from my stash.  The tags I printed and cut with my Imagine.  It took a while to figure out how to get it to just print and them cut.  It involved putting the text on one layer in the Craft room and the square on another layer.  Then you just print on the paper first and then go back and cut the second layer afterwards.  I used the font from the Once Upon a Princess cartridge for all the tags.  The cartridges I used for the images are below.

  • Butterflies are from Kate's ABC's and Ultimate Creative Sampler
  • Birds are from Create a Critter
  • Flowers are from Kate's ABC's
  • Cupcake from Once Upon a Princess
So there you have it.  I filled the boxes with candy and a Target gift card.   I had a bunch of fun doing these boxes.  Thanks for visiting and hope you have a wonderful week. 

Monday, May 14, 2012

Mother's Day with the Cricut

Hi all, I have been missing for a while.  Not much crafting going on here with so many people in an out.  The place I have to craft is my dining room table, so when we have guests I can't really craft.  But my wonderful hubby gave me the best gift for Mother's Day.  He is going to build me a custom craft desk for our loft.  It is his office currently, but he is rarely in there anymore due to offsite work commitments.  I can't wait till it is done!!!
Anyhow, today I have a card I made for his mother.  It is kinda simple just like his mom so I think it came out great.  She really isn't a girly girl so I though blue would be best.


Card Recipe:
  • Card base is from Wrap it Up cut at 5.25"
  • Mom is from Ultimate Creative Sampler cut at 4"
  • Card stock is from DCWV
  • Flourish Cuttlebug folder
 So I am getting back on track with this post.  I have some teacher's gifts and Cinco de Mayo stuff that I did to share with you later in the week.  I hope you all get a chance to express your creative side this week.  Till next time!!!


Wednesday, May 2, 2012

Mother's Day Card with the Cricut

Hi all.  How is everyone doing.  I am back to crafting again, yeah!!!  I have been working on a couple projects with Mother's day and Teacher Appreciation week approaching.  Today I have a Mother's Day card to share with you.


Card Recipe:

  • Card base is 6" by 6" DCWV Textured paper stack
  • Frame is cut on the Circuit Imagine at 5.5" x 5.5" using RBG code 153, 150, 71
  • Striped paper is DCWV Fabric paper
  • Flowers are cut with the Cricut from Forever Young.  The flower sizes are 1", 1.25", 1.5",1.75" and 2"
  • Pearls are Martha Stewart
  • Stitching is done with We R Memory Keepers Sew Easy and Floss
  • Mom is cut with the Ultimate Creative Sampler cartridge at 1.5"
  • Corner Chomper to round the card edges

I really love this card and can't wait to send it to my Mom.  This was also my first time using the Sew Easy tool and do really love how easy it is to use.  I am entering this card in the weekly challenge over at My Craft Spot.  I will have some more stuff up soon as I finish the projects.  Thanks for stopping by and hope you have a fabulous week.

Monday, April 23, 2012

Scrapbooking with the Cricut

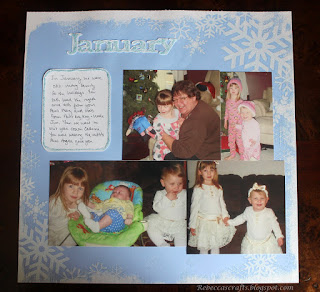
Hi all, hope you have had a good weekend.  I had a pretty good one, spent the evenings getting some much needed scrapbooking done.  I love scrapping but always have a hard time getting started.  Well this weekend I decided I was going to get started on our 2011 family album.  I have done first year albums for my girls but never a family album.  I though the first couple layouts came out pretty good.  I am not going to list recipes for the pages only the Cricut cartridges I used.  So here we go.


Cricut Cartridges Used:

  • Plantin Schoolbook
  • Kate's ABCs
  • Stretch Your Imagination
  • Cricut Craft Room Basics
  • Gypsy Font

 So there they are.  I think I got a pretty good start and am going to try and dedicate one night a week to scrapping until I get the album done.  I am now going to start working on some projects for Teachers Gifts.  Not sure what I am going to do yet.  If you have any ideas for Teacher Appreciation week I would love to hear about them.  Have a great week.

Wednesday, April 18, 2012

Quick Update

Hi all, how is everything going?  I have been absent for a couple weeks and boy what a couple weeks it has been.  Between family visiting for Easter and taking care of my niece for a week there hasn't been much time for crafting or blogging.  But it was really fun, a bunch of work, but great fun.  I am now back to crafting and will soon have some new projects up.  Hope your week has been going well and you have had the chance to craft away.

Tuesday, April 3, 2012

Cricut Crafted Easter Cards

Hi all, I have been missing for a while but I am back with my final round of Easter Cards.  Finally got them all finished last night and plan to mail them out tomorrow.  I have three cards today.  I think the kids are going to love them.  The first card is an Easter basket card.  I used one of the new Cricut Digital cartridges Easter for this card.


This card was really quick and easy to put together.  I think it is the little touches with the ribbon and stickles that make the card special.  I am entering this card in the Fantabulous Cricut Egg challenge this week.

Card Recipe:
  • Easter basket cut from Stretch your Imagination at 4.4"
  • Eggs cut from the digital cartridge Easter at 1"
  • Happy Easter from digital cartridge Easter at 2"
  • Ribbon from Michaels
  • Crystal Stickles
The second card is a tulip Easter card.  This was another really simple card to put together.


Card Recipe:
  • A2 sized card
  • Bunny frame from Elegant Edges cut at 5.25" (This is the oblong feature)
  • Tulips from digital cartridge Easter cut at 3.25"
  • Banner from the Ultimate Creative Sampler cut at 1"
  • Swiss dots Cuttlebug Folder
The third and final card is an Easter bunny card.  This is a shape card made by welding two images in the Cricut Craft Room.  The card base is the stamp shadow from Elegant Edges.  I welded two of them together to make the shaped card.  I am entering this card into the Easter challenge at My Craft Spot this week.


Card Recipe:
  •  Card Base is the stamp shadow from Elegant Edges cut at 5.5"
  • Card frame Elegant Edges cut at 4.9"
  • Bunny with carrot from Simply Charmed cut at 4"
  • Happy Easter is done using Gypsy Font cut at 1"
Hope you enjoyed the cards and have a wonderful Easter.  Thanks for stopping by.