Thursday, May 31, 2012

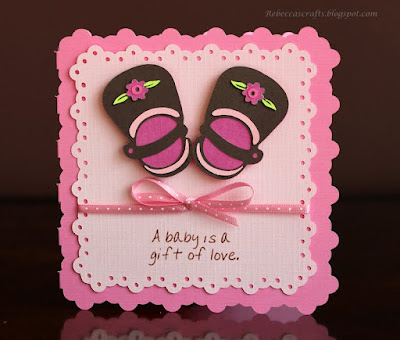
Baby Shoes Card using the Cricut

Hi

How is everyone's week going?  We are doing great, enjoying the warm weather and lounging at the pool.  So for today's project I have another congrats baby card.  My cousin had a new arrival a couple weeks ago and I wanted to make him and his wife a card to congratulate them.  Here it is:


Card Recipe:

  • Card stock from DCWV textured stack
  • Card base cut from Elegant Edges, Lace at 5" and then two welded together to make a card
  • Light pink frame from Elegant Edges, Lace at 4.3"
  • Shoes from Kate's ABCs  at 2"
  • Sentiment from My Pink Stamper Sweet Baby
  • Ribbon from Michaels
Thanks for visiting and hope you all have a fantastic week.

Tuesday, May 29, 2012

Craft Center Done!!!

Hi all, hope you have had a wonderful Memorial Day weekend.  We had a great one.  One of the things that we got completed was my craft center.  Yeah!!!!  My husband made this craft center from scratch, meaning plywood.   He did an amazing job.  Okay so I have to give some credit also to my little girls.  They helped daddy assemble and paint it.  They are both going to put some man to shame with their handy woman skills someday.  At 2 and 4 years old they know all the power tools and what they are used for!!!  So proud of them.  So without further adieu here it is.


Here is the whole thing.  So much crafting space!!!


This is my paper organizer.  On the desk top above it I will put my Cricut Expression.


This is my drawer space and ribbon organizer.  Haven't decided what will be in each drawer but I am sure it will be soon filled.


This is the actual ribbon organizer.  It is different from the previous pictures because we redesigned it.  Originally the ribbons were going to actually be an the dowels, but after some thought decided that it would be easier to maintain with this set up.  I put my ribbon in it yesterday and I must have too much ribbon because it is almost filled!!!  I love it.


So that is it.  I really love it and can't wait to create something in the space.  I may be doing that tonight.  Hope you all have a good week.  I will have some more posts on projects this week!!!  Thanks for visiting. 

Tuesday, May 22, 2012

Graduation Card with the Cricut

Hi all, hope your week has been going well.  Ours has been pretty good.  We got off to a good start this week, with meal planning and the like.  I even went to the gym before 9 am!!!  That is a feat around here.  Anyhow, I am bringing you a Graduation card I made for my darling 4 year old.  She is graduating from pre-school tomorrow.  She is so excited because she gets to sing with all of her class mates for the parents.  I can't wait to see if she actually sings once she gets in front of all those people.  So here is the card.


Card Recipe:

  • DCWV textured card stock cut down to an A2 size card
  • White card stock cut to 4" x 5.25" and embossed with the Swiss Dots Cuttlebug folder
  • Ribbon from Michaels
  • Girl cut from Once Upon a Princess at 3"
  • Outfit cut from Once Upon a Princess at 3"
  • Graduation cap made from two shapes in the Cricut Craft Room Basics
  • Tassel made with We R Memory Keepers Watermelon Floss
  • Sentiments from My Pink Stamper Sweet Baby and Family & Friends
Well thats the card.  I love how the tassel came out.  I found out after I made the card that her cap is white.  Had I known I would have customized that.  Oh well.  I am entering this card into two challenges this week.  The Graduation challenge over at Fantabulous Cricut and the Congratulations challenge over at My Craft Spot.   Thanks for stopping by, I hope you have a great week. 

Monday, May 21, 2012

Craft Center Progress!!!

Hi all, I hope your weekend was fantastic.  Mine was great.  My hubby got started on my craft center and made great progress.  So super excited about that.  I helped him cut most of the wood for the project which feels good.  I actually contributed to a wood crafting project!!!  I don't really do power tools so this is a stretch for me.  Anyhow I wanted to share some pictures of the progress.


This is what he started with.


This is what he got done on day one.  He did this all from his head!!!  He really is super talented.


This is what he did on day two.


This shelving side is to hold 12 x 12 paper and underneath my Cricut Imagine.


This side has three drawers and a custom ribbon holder/dispenser.  I am loving this ribbon storage inside the actual desk.  Underneath I plan to put my bin of random supplies.


So that is the progress so far.  Next weekend we get to paint it, install the hardware, and install it in the space.  By Monday I should have and installed craft space.  So excited.  I will post pictures once it is complete.  Have a great evening. 

Wednesday, May 16, 2012

Teacher Appreciation Gifts with the Cricut

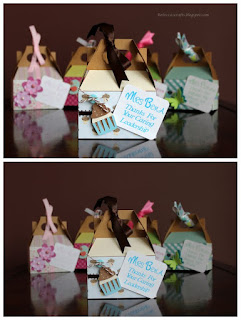
Hi all, I am back as promised with some Teacher Appreciation gifts I did last week.  These came together pretty fast and the teachers loved them.  I will not list a recipe for each, just a list of cartridges that I used to create them.


So I used these great gable gift boxes I found a Target in their dollar section.  Them came 3 to a pack for a dollar.  You can't beat that!!  I used a variety of patterned papers to decorate the sides of the boxes and some ribbon from my stash.  The tags I printed and cut with my Imagine.  It took a while to figure out how to get it to just print and them cut.  It involved putting the text on one layer in the Craft room and the square on another layer.  Then you just print on the paper first and then go back and cut the second layer afterwards.  I used the font from the Once Upon a Princess cartridge for all the tags.  The cartridges I used for the images are below.

  • Butterflies are from Kate's ABC's and Ultimate Creative Sampler
  • Birds are from Create a Critter
  • Flowers are from Kate's ABC's
  • Cupcake from Once Upon a Princess
So there you have it.  I filled the boxes with candy and a Target gift card.   I had a bunch of fun doing these boxes.  Thanks for visiting and hope you have a wonderful week. 

Monday, May 14, 2012

Mother's Day with the Cricut

Hi all, I have been missing for a while.  Not much crafting going on here with so many people in an out.  The place I have to craft is my dining room table, so when we have guests I can't really craft.  But my wonderful hubby gave me the best gift for Mother's Day.  He is going to build me a custom craft desk for our loft.  It is his office currently, but he is rarely in there anymore due to offsite work commitments.  I can't wait till it is done!!!
Anyhow, today I have a card I made for his mother.  It is kinda simple just like his mom so I think it came out great.  She really isn't a girly girl so I though blue would be best.


Card Recipe:
  • Card base is from Wrap it Up cut at 5.25"
  • Mom is from Ultimate Creative Sampler cut at 4"
  • Card stock is from DCWV
  • Flourish Cuttlebug folder
 So I am getting back on track with this post.  I have some teacher's gifts and Cinco de Mayo stuff that I did to share with you later in the week.  I hope you all get a chance to express your creative side this week.  Till next time!!!


Wednesday, May 2, 2012

Mother's Day Card with the Cricut

Hi all.  How is everyone doing.  I am back to crafting again, yeah!!!  I have been working on a couple projects with Mother's day and Teacher Appreciation week approaching.  Today I have a Mother's Day card to share with you.


Card Recipe:

  • Card base is 6" by 6" DCWV Textured paper stack
  • Frame is cut on the Circuit Imagine at 5.5" x 5.5" using RBG code 153, 150, 71
  • Striped paper is DCWV Fabric paper
  • Flowers are cut with the Cricut from Forever Young.  The flower sizes are 1", 1.25", 1.5",1.75" and 2"
  • Pearls are Martha Stewart
  • Stitching is done with We R Memory Keepers Sew Easy and Floss
  • Mom is cut with the Ultimate Creative Sampler cartridge at 1.5"
  • Corner Chomper to round the card edges

I really love this card and can't wait to send it to my Mom.  This was also my first time using the Sew Easy tool and do really love how easy it is to use.  I am entering this card in the weekly challenge over at My Craft Spot.  I will have some more stuff up soon as I finish the projects.  Thanks for stopping by and hope you have a fabulous week.