Showing posts with label Cuttlebug. Show all posts

Tuesday, June 12, 2012

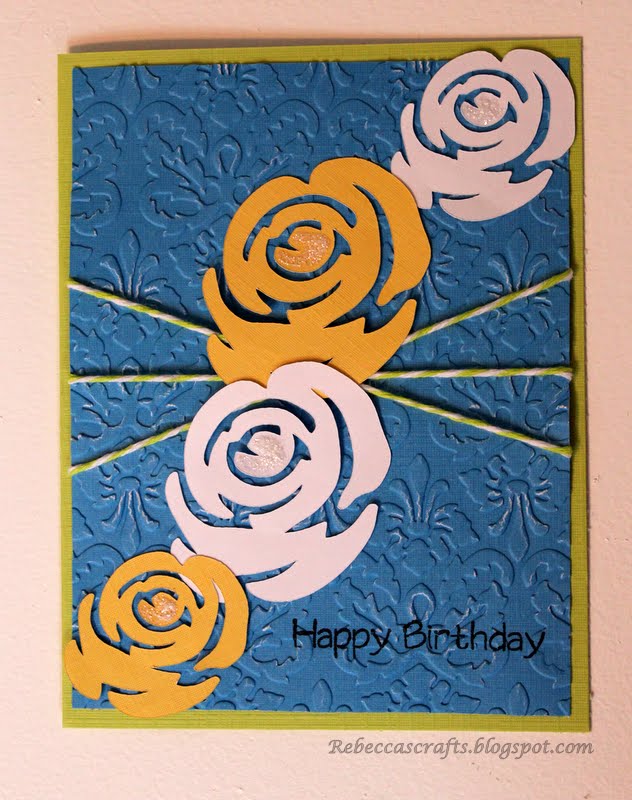
Rose Birthday Card with Cricut

Hi all, hope your week has been going great.  We are busy busy with summer!!  Also getting ready for father's day.  I think this is one of my girl's favorite days because they love their Daddy so much.  So my project for today is a card I made for a friend of mine.  She celebrated her birthday over the weekend and I wanted to make her a card for her special day.  I was having trouble coming up with an idea so I turned to some challenge blogs for inspiration.  I came across the Bitten by the Bug 2 challenge which is themed around roses and decided to go with it.


Card Recipe:

  • A2 sized card
  • Indie Art Roses cut at 3" and 4"
  • My Minds Eye lime twist twine
  • Flourish Cuttlebug folder
  • Frosted Lace stickles
  • Sentiment from My Pink Stamper Family and Friends
I really love how the Cuttlebug folder kinda distressed the blue paper, gives it a little more dimension.  This card was pretty fast to put together.  That's what I love about the challenges, they can sometimes inspire my creations.   Hope you have enjoyed and thanks for stopping by.


Tuesday, May 22, 2012

Graduation Card with the Cricut

Hi all, hope your week has been going well.  Ours has been pretty good.  We got off to a good start this week, with meal planning and the like.  I even went to the gym before 9 am!!!  That is a feat around here.  Anyhow, I am bringing you a Graduation card I made for my darling 4 year old.  She is graduating from pre-school tomorrow.  She is so excited because she gets to sing with all of her class mates for the parents.  I can't wait to see if she actually sings once she gets in front of all those people.  So here is the card.


Card Recipe:

  • DCWV textured card stock cut down to an A2 size card
  • White card stock cut to 4" x 5.25" and embossed with the Swiss Dots Cuttlebug folder
  • Ribbon from Michaels
  • Girl cut from Once Upon a Princess at 3"
  • Outfit cut from Once Upon a Princess at 3"
  • Graduation cap made from two shapes in the Cricut Craft Room Basics
  • Tassel made with We R Memory Keepers Watermelon Floss
  • Sentiments from My Pink Stamper Sweet Baby and Family & Friends
Well thats the card.  I love how the tassel came out.  I found out after I made the card that her cap is white.  Had I known I would have customized that.  Oh well.  I am entering this card into two challenges this week.  The Graduation challenge over at Fantabulous Cricut and the Congratulations challenge over at My Craft Spot.   Thanks for stopping by, I hope you have a great week. 

Monday, May 14, 2012

Mother's Day with the Cricut

Hi all, I have been missing for a while.  Not much crafting going on here with so many people in an out.  The place I have to craft is my dining room table, so when we have guests I can't really craft.  But my wonderful hubby gave me the best gift for Mother's Day.  He is going to build me a custom craft desk for our loft.  It is his office currently, but he is rarely in there anymore due to offsite work commitments.  I can't wait till it is done!!!
Anyhow, today I have a card I made for his mother.  It is kinda simple just like his mom so I think it came out great.  She really isn't a girly girl so I though blue would be best.


Card Recipe:
  • Card base is from Wrap it Up cut at 5.25"
  • Mom is from Ultimate Creative Sampler cut at 4"
  • Card stock is from DCWV
  • Flourish Cuttlebug folder
 So I am getting back on track with this post.  I have some teacher's gifts and Cinco de Mayo stuff that I did to share with you later in the week.  I hope you all get a chance to express your creative side this week.  Till next time!!!


Tuesday, April 3, 2012

Cricut Crafted Easter Cards

Hi all, I have been missing for a while but I am back with my final round of Easter Cards.  Finally got them all finished last night and plan to mail them out tomorrow.  I have three cards today.  I think the kids are going to love them.  The first card is an Easter basket card.  I used one of the new Cricut Digital cartridges Easter for this card.


This card was really quick and easy to put together.  I think it is the little touches with the ribbon and stickles that make the card special.  I am entering this card in the Fantabulous Cricut Egg challenge this week.

Card Recipe:
  • Easter basket cut from Stretch your Imagination at 4.4"
  • Eggs cut from the digital cartridge Easter at 1"
  • Happy Easter from digital cartridge Easter at 2"
  • Ribbon from Michaels
  • Crystal Stickles
The second card is a tulip Easter card.  This was another really simple card to put together.


Card Recipe:
  • A2 sized card
  • Bunny frame from Elegant Edges cut at 5.25" (This is the oblong feature)
  • Tulips from digital cartridge Easter cut at 3.25"
  • Banner from the Ultimate Creative Sampler cut at 1"
  • Swiss dots Cuttlebug Folder
The third and final card is an Easter bunny card.  This is a shape card made by welding two images in the Cricut Craft Room.  The card base is the stamp shadow from Elegant Edges.  I welded two of them together to make the shaped card.  I am entering this card into the Easter challenge at My Craft Spot this week.


Card Recipe:
  •  Card Base is the stamp shadow from Elegant Edges cut at 5.5"
  • Card frame Elegant Edges cut at 4.9"
  • Bunny with carrot from Simply Charmed cut at 4"
  • Happy Easter is done using Gypsy Font cut at 1"
Hope you enjoyed the cards and have a wonderful Easter.  Thanks for stopping by.

Thursday, March 22, 2012

Easter Cards - Part 1

Hi all, I hope that the week has been going well.  I finally got to some crafting last night and made my first of several Easter cards that I will be making this year.  I love this time of year because it means that everything is in bloom and there are new beginnings.  This first card that I made really has all the bright colors that I love.


I base the color design around the ribbon.  I don't have any Easter stamps so I let the ribbon do the work for me.  Also all the paper used on this card was from my scrap bin.  I get excited anytime I don't have to use a brand-new piece of paper.

Card Recipe:

  • Card base is 5" x 5" white card stock
  • Scalloped matting is cut from the Elegant Edges cartridge at 4.75" 
  • I used the Cuttlebug polka-dot folder to emboss the mat
  • Bunny scene is from Kate's ABC's cut at 3"
I will be posting many more Easter/Spring cards as I get them finished.  I am entering this card in the weekly challenge over at My Craft Spot.  Thanks for stopping by, I am now off to get my hair done, yeah!!!!

Sunday, February 12, 2012

Valentines Treat Toppers - MPS Blog Hop Challenge

Good afternoon all, I hope you are all having a wonderful weekend.  I found some time this weekend to work on some treat toppers for my girls class Valentine's party.  I am making Red Velvet Whoppie pies for her class and wanted some cute packaging for them.  I also did the My Pink Stamper Blog hop and wanted to use the challenge guidelines as the basis for the treat toppers.  The challenge was to make a project with a circle, the color red, pink ribbon and two stamped sentiments.  Here is what I came up with.


Craft Recipe:
  • Red card stock cut at 5" x 7", then scored at 2.5" on the 5" side so it can be folded in half
  • Scalloped hearts from Craft Room Exclusives - this is a free digital cartridge for everyone
  • Ribbon with pink and red hearts from Michaels
  • Sentiments on outer hearts both from My Pink Stamper Sweetest Cupcakes
  • XO just an alphabet stamp set from Michaels
  • Polka - dot Cuttlebug folder

So I think I did pretty good with the challenge rules.  If you haven't found my circle it's the embossing on the red card stock.  Pretty clever huh.  I will try to post a picture with the whoopie pies inside the bags.  Hope you enjoy and your week gets off to a great start.

Thursday, February 9, 2012

Valentine's Love

Good evening all.  It has been a crazy week here but for good reason.  We have one extra toddler in the house, my brother's daughter.  We are taking care of her while my sister-in-law goes to meet my brother who just came back from Afghanistan.  We are so glad he is back safe and sound for good and are really grateful for his service.  A house with three children 4 and under does make for a little chaos but alot of fun.
The project I have for you tonight is the boxes I made for my 4 year old's class valentines.  I decided to make little match boxes to hold candy for the kids.  She loves them and very proudly wrote her name on the back of each box.


Craft Recipe:

   * Matchbox cut at 4" from Tags, Bags, Boxes and More
   * Heart cut from Create-a-Critter cut at 1.5"
   * Sentiment from My Pink Stamper Love-alicious
   * Swiss Dot cuttlebug folder
   * Xmas Red Stickles
   * Ribbon from stash

I just used a standard tape runner for the adhesive as I figured they would get torn apart while the kids were trying to get the candy.  I am entering this in the weekly challenge over at Fantabulous Cricut, which was to use a heart on your project.  Hope you all enjoy and have a great end to your week. 
Friday, January 27, 2012

Welcome Baby!!

Good evening.  Just thought that I would pop in while my kids are watching a movie.  It is movie night around here and while I do sit an watch with the kids I really can't just be idle while doing so, just not my thing.
Anyhow as the title says Welcome Baby...  Wanted to congratulate my sister-in-law on thier new arrival this week.  A brand new baby girl.  We are so excited for them and really can't wait to meet her.  They don't live near us so we will be planning a trip soon to meet this new bundle of joy.  Speaking of bundle of joy I did make them a card to celebrate her arrival.

Card Recipe:

  • Card size is standard A2
  • Baby carriage is from Simply Charmed cartridge cut at 3"
  • Sentiment is My Pink Stamper Sweet Baby set
  • Used the Cuttlebug to emboss the white paper
  • Ribbon is from Michaels
This card was pretty simple to put together.  I really like how the embossing matches the ribbon.  Hope you enjoy and have a fabulous weekend.  I have also decided to enter this in a challenge over at Bitten By the Bug 2.   

Thursday, October 6, 2011

Birthday Madness

Hi all
We are into our crazy birthday month over here in our household.  We just celebrated our oldest daughters' 4th birthday a couple days ago and had so much fun.  I wanted to share a couple of projects that I did to celebrate her birthday.
The first project was a banner.  This is the first banner that I have made and really had fun doing it.  I wanted to embellish it more but ran out of time.  I plan on doing one for our younger daughter later this month and will definately try to do something different.  I think I may need to invest in a new camera because the white letters didn't show up so well in the picture but it looked great in person.

The Recipe is:
  • Waved triangle from Birthday Bash at 6.25"
  • Standard triangle from Birthday Bash at 6"
  • Lettering from Once Upon a Princess at 2.5"
  • I used craft ribbon to attach the banner pieces together and kitchen twine to hang the completed banners
The second project was a birthday card for my little girl.  She really loves bugs so I decided to go with a ladybug.  This was just a quick card that I through together last minute so it is nothing fancy but she still loved it.  The flowers were from her Daddy.  Some poor man in the future is going to be in trouble because my hubby always gets the girls flowers for special occasions.
The Recipe is:
  • Card base is 6" x 6" of white card stock
  • Image base is 5" x 5" of pink card stock that I embossed with the Swiss Dots Cuttlebug folder.
  • Ladybug from Birthday Bash at 4.5"
  • After the fact I also added white stickels to the tops of the bugs antenna
  • Sentiment is My Pink Stamper - Family & Friends
The last project I did was to make treat bags and cookies for my daughters school birthday celebration.  It is really nice that they allow us to bring in cookies for the kids and they all sing happy birthday at lunch.  I also made a triple batch of these cookies to send to my brother overseas.  He just left from is mid-tour leave and I thought that it would make going back a little easier.  So here are the cookies and treat bag toppers.


The Recipe is:

  • Topper base is an image from Birthday Bash at 4.5" and is embossed with the Swiss Dots folder for the Cuttlebug
  • Image base from Accent Essentials at 3.5" wide by 2.1" high
  • Birthday hat from Simply Charmed at 2"
  • Sentiment is My Pink Stamper - Sweetest Cupcakes
Hope you all enjoy these projects and please feel free to leave me comments on how I can make my pictures come out better.  It is either me or the camera and so far can't figure it out.  Anyhow hope you have a great evening.  

Tuesday, September 6, 2011

Thank You Card

Hi all
I had mentioned a while back that I had mad a thank you card for my sister in-law.  I can finally post it because I think that she has received it.  I didn't want to post it until she had received it because sometimes she does read my blog.  Anyway here it is...

The ribbon was the inspiration for the card colors.  I also got to use my new Cuttlebug that my wonderful husband got me for my birthday.  Hope you enjoy.

Card recipe:
  • Flower 1 from Forever Young at 3.5"
  • Flower embossing folder for the Cuttlebug
  • My Pink Stamper - Everyday Life